

Cast Iron 101: Buying, Seasoning, and Cooking.
Cast iron skillets are the one piece of kitchen equipment that people either love or hate. There does not seem to be much room for a middle ground, and I completely understand.
To be honest, cast iron used to terrify me. With any other item, if I royally screwed up I could just throw it out and buy a new one. But with cast iron, you do not do that.
It is supposed to last for generations and the thought of messing up something that should be indestructible was just too much for me.
That may seem silly to yall, but even though I grew up in the deep south, I did not grow up with cast iron. We always had those Teflon-coated pans. You know, the really cheap ones you can get from Walmart that ended up scratching and flaking before they were even a year old.
Buying new pans every year or every other year was just something we did, and it seemed so normal to me. Having a pan that could last hundreds of years just overwhelmed and intimidated me. However, I think through my journey of learning how to conquer cast iron, I have gained a greater sense of permanence. I no longer just think of things as disposable and instead, I look towards purchasing those items that are meant to last me.

Cast Iron is a piece of kitchen equipment I recommend everyone having. It can be a little intimidating, but I am here to guide you through it. I learned through trial and error, plus the guidance of my husband, how to care for my cast iron. I can happily say that it is now my most used kitchen equipment.
If you are feeling intimidated by cast iron, let me guide you through the basics and help boost your confidence.
How to Know if a Cast Iron Skillet is a Good Buy.
When you are on the hunt for that perfect piece of cast iron, I recommend you go to yard sales, pawnshops, and antique shops. Cast iron lasts for generations and you are more likely to find the good old stuff in these places.
You can also purchase your cast iron online, we got our set from eBay, but it can be much harder to tell quality from pictures and you are taking a gamble on your purchase.
When you are looking for a good quality piece of cast iron, check for pits, wobbles, rust, and rings.
Is it pitted, or is it smooth inside? Do not be afraid to rub your fingers along the inside. A pan with 1 or 2 small, shallow pit marks is ok, but anything more than that and you really want to think twice about it. The smoother, the better.
If you see some sticky place, with gunk build-up, that just means somebody did a bad seasoning job on it. It will clean right off, so ignore it for now.
Does it wobble? Place it on a flat surface, tap on the rim. If it wobbles, you do not want it. It will not heat evenly.
Look for rust. What do you see? Some rust on the surface is not a big deal, but if the rust looks to continue any deeper, just walk away.
Check for rings. Some older cast iron skillets have a ring around the bottom of the pan. If you have a gas stove, this is ok. If you have a flat-top stove, this will not heat evenly for you, so you will want to avoid these pans unless you are purchasing them for decorative pieces.

Our cast iron skillets are a brand called Wagner. The Wagner brand has been around since 1891 and was founded by two brothers, and later joined by 2 more brothers, to be a family operation.
We have a set of 4, in varying sizes, all of which were made prior to 1960. We know this because, after 1960, the Wagner company stamped USA or Made in the USA on the bottom of the pans. Wagner cast iron pieces with these stamps on them are not considered collector pieces, but if you have set like ours without this, they are considered collector pieces and could sell for a good amount. Whether a cast iron is a collector piece or not, does not affect how good it will cook your food, but it is fun to know the history behind your pans.

Cast Iron is a piece of kitchen equipment I recommend everyone having. It can be a little intimidating, but I am here to guide you through it. I learned through trial and error, plus the guidance of my husband, how to care for my cast iron. I can happily say that it is now my most used kitchen equipment.
If you are feeling intimidated by cast iron, let me guide you through the basics and help boost your confidence.
In cast iron skillets, the brand is not as important as the condition of the actual cast iron. The reason we advocate for antique pieces is within the last century OSHA forced a change in the material cast iron is made of.
It used to be a very fine sand that was easy to breathe in and could cause major respiratory issues to the workers crafting these pans. OSHA required bigger particles of sand to be used and this created a rougher, heavier pan.
Pieces like ours are smoother and lighter, plus they are much easier to get to be nonstick. We do not see a problem with using them, as we are not causing any additional harm to the workers who created them.
You can get a type of cast iron, called Modern Smooth, that is formed and ground down to resemble the smoothness historical techniques were able to achieve, but it carries a huge price tag that I just do not find worth the investment at this time. I know many people rave about these pans, but I am happy with the ones I currently have.
If you have one of these modern smooth cast iron pans, let me know how you like it below!
How to Clean a Cast Iron Skillet
First, remove all the old seasoning and any rust that is on your pan.
To do this, you need to place the pan in an oven or an old fire where the coals are still warm, but not red hot or having any flames. You want this pan to get incredibly hot, around 500 degrees Fahrenheit. If you choose the oven route, you can use the self-cleaning mode on your oven or just turn the baking temperature as high as you can get it.
If you are doing this inside, make sure the area is well ventilated. You are likely to get some smoke coming from your pan.
After the pan has come up to temp, you want it to remain at this temperature for at least an hour, and then allow it to cool back down. If you are choosing to stick it in with warm coals, leave the pan in with the coals until everything is cool to the touch.
If any rust still remains on the pan, after the pan has cooled completely. scrub the pan with a fine steel wool pad or an SOS pad that is detergent free.
Cast Iron is a piece of kitchen equipment I recommend everyone having. It can be a little intimidating, but I am here to guide you through it. I learned through trial and error, plus the guidance of my husband, how to care for my cast iron. I can happily say that it is now my most used kitchen equipment.
If you are feeling intimidated by cast iron, let me guide you through the basics and help boost your confidence.
Second, wash the pan with soap and water, give it a good scrubbing, and then wipe it dry.
This is the only time you will see me tell you to go full force with the soap and water on your pan. Soap and water, especially hot water, can aid in the removal of the seasoning on your pan, but that is exactly what we are trying to achieve in this pan.
After washing, you want your pan to be as dry as you can possibly get it. It may look greyish and very dull, but that is good. It means you have gotten all of the old oil and seasoning off of your pan. Cast iron itself is not black, that is just the color created when the oils bond to the pan from heat, also known as seasoning.
To help your pan finish drying, you will want to place it in the oven for about 10 minutes. You can do this during the preheating phase for the fourth step or by heating the oven up to 250 and allowing the pan to bake for 10 minutes at this temperature. You will want it cooled off enough to handle it, but still very warm for the fourth step.
Warning: When removing your cast iron from the oven use caution. Every inch of cast iron gets hot, even the handle. You will want some good quality oven mitts or ones made specifically for handling hot cast iron.
Third, choose your oil for seasoning.
You need to choose the oil you want to use for seasoning your pan. Bacon grease/Lard, Crisco, Canola oil, vegetable oil, coconut oil, and flaxseed oil are some popular choices. We mainly use bacon grease, lard, or canola oil, but the first coat on our pans was done with Flaxseed oil.
Whichever oil you choose, you need to know its smoking point. You will set your oven to preheat to 25 degrees above this smoking point
Below are the smoking points for the oils we have suggested.
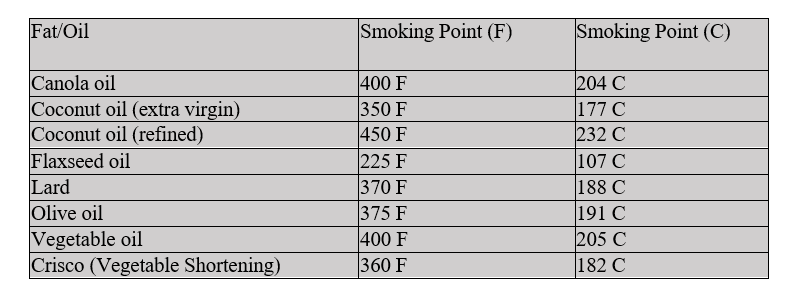
If you want to use a different oil not listed above, check out this page on The Spruce Eats for a has a great list to choose from.
Fourth, Seasoning Cast Iron
Take your chosen oil and place a quarter size on a paper towel or cloth.
Coat your cast iron in a THIN coat of this oil. Use more oil as needed, but always working in small amounts.
You want to cover every part of the cast iron, including the handle and bottom of the pan. The seasoning not only helps it be nonstick, but it also helps to prevent rust.
Then you need to take a clean cloth and wipe as much of the oil back off as you can. Do not worry, you will not be able to get all of the oil back off of the pan. Some oil will remain in the pores of the cast iron, but you do not want any puddles or heavily oiled spots. This will make your cast iron feel sticky and cause a build up of gunk.
You want it to be dry and will know you have gotten most oil back off when it is no longer shiny.
Place your cast iron inside the oven upside down. If any extra oil is remaining in the cast iron this will allow it to drip out and not puddle in the pan.
Place a cookie sheet on the bottom rack of your oven, if you have two racks, to catch any drippage.
Leave the cast iron in the oven to bake for 1 hour.
Cut oven off, open the door, and let it cool all the way down. If you have small children and are worried about them getting into the oven, you can also remove the cast iron and set it on the stove top or in a safe place to cool. It will be very hot, so use caution and good potholders.
After cast iron has cooled, inspect it for any signs that the oil has puddled or ran. Wipe it with a cloth and see if the cloth comes clean.
Then you want to repeat, the seasoning step 2 or 3 times. We do 3, but some other cast iron loves swear that 4th time is the charm.
This is a long process, but it is so worth it!
It is ok to do 1 coat each day and stretch it out over a couple of days.
After you have completed this process your pan is now seasoned and is ready for use. See the tips sections for help in using your cast iron pan.

Cast Iron is a piece of kitchen equipment I recommend everyone having. It can be a little intimidating, but I am here to guide you through it. I learned through trial and error, plus the guidance of my husband, how to care for my cast iron. I can happily say that it is now my most used kitchen equipment.
If you are feeling intimidated by cast iron, let me guide you through the basics and help boost your confidence.
Caring for your cast iron
When using a cast iron pan, you never want to just sit it on heat and let it go. You will cook your seasoning right off! Can you imagine wasting all your hard work?
Instead, every time you put your cast iron on heat add oil to it. Olive oil, butter, and bacon grease are my go-to oils.
After cooking, DO NOT SOAK your cast iron. If you do not remember anything else from this post, you need to remember this. You NEVER want to soak cast iron. It will rust very quickly. Even a small amount of water in contact with your cast iron will rust it.
Water is cast irons kryptonite.
While your cast iron is warm, but not hot, wipe it with a cloth or paper towel. If you have some stuck on food bits you should use a cast iron scraper and scrape them off.
If that does not work, put about a table spoon of normal table salt in to the bottom of you pan and scrub the pan with the salt, using a cloth or paper towel.
Next up in cleaning power, hot water. Remember, this is cast irons kryptonite so the least amount of water and the least amount of time in water is what you are aiming for.
If you use water, you need to place your cast iron into a heated oven to dry out and then always add another coat of seasoning.
Soap and water are last resorts. I do not recommend using them every single time you cook with your pan, but there are just somethings I find need the soap and water to get it clean. Gravy is one for me, I always need soap and water after, but that’s ok.
If you use your cast iron for every meal, like we do, you can add a quick coat of seasoning daily. If you don’t use yours that often you may only need to add a quick coat of seasoning, once weekly or once monthly. If your pan starts looking dull or sticking, you are past due for a new coat.
To quick coat season, put your cast iron on the stove and cut the stove burner on to medium heat, while the cast iron is heating up rub a thin coat of oil on to the inside of your pan. Remember to keep it thin, work quickly, and get as much oil back off of it as possible. Be very careful and do not burn yourself. Cast iron transmits heat throughout, so as it heats up every inch of it gets hot. Watch your cast iron, when you can see the oil you rubbed on start putting off a small amount of smoke cut off the burner, wipe the inside very well. Any extra oil that wasn’t used up in the seasoning process needs to come back off. Use this same cloth to go ahead and wipe the handle and bottom of your pan, the extra oil you pulled back off the pan will add another layer of protection to these parts.
Tips for Cooking with Cast Iron.
When you first start using your cast iron, the best thing to cook in it is bacon! It helps to continue building your seasoning up.
It may stick the first few times you use your cast iron. It is expected and it is not anything you are doing wrong. Just push through, follow our steps, and soon your food will just slide right on out.
Always place your food into a heated cast iron. If you start food out in cold cast iron, it will stick.
Always place oil into cast iron immediately, you do not want your cast iron to get hot with no oil in it. You will cook off your seasoning.
If you get a white or light grey spot in the bottom of your cast iron it is getting too hot without oil in it and your seasoning is been cooking off. It is ok. Just get some oil in it quick and keep cooking. If the spot stays after you finish cooking you meal, you pan will need to be reseasoned.
If you see dark spots or dried oil spots, the seasoning on your pan go too thick at this point. You can strip it down and start over.
Be patient with your cast iron. Take good care of it and it will take good care of you.